Core concepts
What are different types of workloads in k8s?
Stateless Application
Applications that doesn’t require it’s state to be saved.
Example: tomcat, nginx server, frontend apps etc.
Stateful Applications
Applications that require it’s state to be saved.
Example: Mongodb, Apache Zookeeper
Batch Jobs
Finite Independent tasks which run to their completion.
Example: Sending emails, perform calculations, video render etc.
Daemon
Ongoing background tasks.
Example: Fluentdcollecting logs continuously. You can use daemonset deployment
Difference between ReplicaSet and a ReplicationController
Replication controller is based on equity-based selector
Example:
spec:
  replicas: 3
  selector:
    app: nginx
ReplicaSet is based on Set-based selector. You can give many labels & give matchLabel selector
Example:
metadata:
  name: frontend
  labels:
    app: guestbook
    tier: frontend
spec:
  # modify replicas according to your case
  replicas: 3
  selector:
    matchLabels:
      tier: frontend
Explain how to deploy a StatefulSet
Let’s try to understand how to install mongodb on k8s using statefulset,
First of all in order to create a replicaset we need the following things,
- a Persistent Volume (PV) with storage class
- a Headless service for network identity
So, we are going to,
- First, we are going to create a headless service using
Servicedeployment usingnginxwith labelapp=nginxthen we are going to create statefulset for nginx image. - using
volumeClaimTemplatewe are going to create persistent volume (PV) with a storage class
---
apiVersion: v1
kind: Service
metadata:
  name: mongo
  labels:
    name: mongo
spec:
  ports:
  - port: 27017
    targetPort: 27017
  clusterIP: None
  selector:
    role: mongo
---
apiVersion: apps/v1beta1
kind: StatefulSet
metadata:
  name: mongo
spec:
  serviceName: "mongo"
  replicas: 3
  template:
    metadata:
      labels:
        role: mongo
        environment: test
    spec:
      terminationGracePeriodSeconds: 10
      containers:
        - name: mongo
          image: mongo
          command:
            - mongod
            - "--replSet"
            - rs0
            - "--smallfiles"
            - "--noprealloc"
          ports:
            - containerPort: 27017
          volumeMounts:
            - name: mongo-persistent-storage
              mountPath: /data/db
        - name: mongo-sidecar
          image: cvallance/mongo-k8s-sidecar
          env:
            - name: MONGO_SIDECAR_POD_LABELS
              value: "role=mongo,environment=test"
  volumeClaimTemplates:
  - metadata:
      name: mongo-persistent-storage
      annotations:
        volume.beta.kubernetes.io/storage-class: "fast"
    spec:
      accessModes: [ "ReadWriteOnce" ]
      resources:
        requests:
          storage: 100Gi
Observation
1) We need to observe that we have set the clusterIp to none to create a headless service.
2) Then we created persistent volume with storage class using volumeClaimTemplate
What is headless Service?
Sometimes we have a single endpoint to a service & we don’t want to use loadbalancer, in that case we use headless service.
A service deployment without load balancing is called a Headless Service.
This is created by setting none to clusterIP (.spec.ClusterIP)
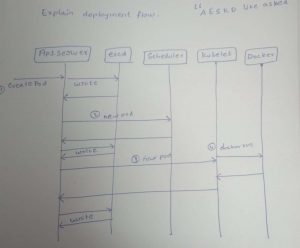
Explain deployment flow.
For instance if you requested to deploy an app via kubectl then picturize the request flow between k8s components

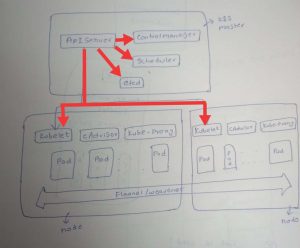
API Server
Kube-API server validates & configures data for api objects like,
- pod
- service
- replication controllers
- etc
The API Server provides REST operations to
Scheduler
Scheduler watches for newly created pods that have no node assigned.
Scheduler finds such pods and responsible for finding the best node to run that pod.
How does a scheduler decide the node?
Its done based on —
- Filtering
- Scoring
Filtering: Finds set of feasible nodes (nodes which meets scheduling requirements)
Scoring: Based on filtering, scheduler gives a score to a node, & a node with highest score will be selected first.
If scores are equal, then selection is random.
Know more about filtering/scoring factors here
How etcd works in k8s?
Etcd is like the brain to k8s cluster
Its a distributed key-value store that stores every information about the cluster & its state.
For example, if we requested the api-server to install something on the cluster, that information will first be recorded in etcd.
Etcd’s watch functionality is used by Kubernetes to monitor changes to either the actual or the desired state of its system. If they are different, Kubernetes makes changes to reconcile the two states. Every read by the kubectl command is retrieved from data stored in Etcd, any change made (kubectl apply) will create or update entries in Etcd, and every crash will trigger value changes in etcd
What is etcd?
- Etcd is an open-source distributed key-value store created by the CoreOS team, now managed by the CNCF.
- It is pronounced “et-cee-dee”, making reference to distributing the Unix
/etcdirectory, where most global configuration files live, across multiple machines.
Properties of etcd
Reliable: The store is properly distributed using the Raft algorithm
Replicated: Its is available on every node of a cluster
Secure: Implements automatic TLS
Explain leader election process in etcd
Etcd is based on Raft algorithm. In a Raft-based system, the cluster holds an election to choose a leader for a given term
Handles client requests which need cluster consensus (an agreement). Responsible for accepting new changing, replicating the information to follower nodes, then commit changes once followers verify. Each cluster can have one leader at any give time.
If Leader dies, then rest of the nodes will begin new election within a predetermined timeout.
How leader is elected
If the node does not hear from the leader before a timeout occurs, the node begins a new election by starting a new term, marking itself as a candidate, and asking for votes from the other nodes.
Each node votes for the first candidate that requests its vote. If a candidate receives a vote from the majority of the nodes in the cluster, it becomes the new leader.
Since the election timeout differs on each node, the first candidate often becomes the new leader.
However, if multiple candidates exist and receive the same number of votes, the existing election term will end without a leader and a new term will begin with new randomized election timers.
How leader makes changes
Any changes must be directed to the leader node & the leader node will send the proposed new value to each node of cluster then node sends the message confirming receipt of new value.
If majority of nodes confirm, then leader commits the new value.
The is the process as per the Raft algorithm
What Object are present in a namespace?
Kubernetes resources such as pods, services, replication controllers etc are in some namespaces.
Low-level resources, such as nodes and persistentVolumes, are not in any namespace.
To see which Kubernetes resources are and aren’t in a namespace:
# In a namespace
kubectl api-resources --namespaced=true

# Not in a namespace
kubectl api-resources --namespaced=falseNetworking
Storage
Configmaps & secrets
Installation
Explain k8s installation
Installting k8s on centOS
First launch three centOS instances whose ip’s are say,
- kubemaster: 192.168.1.99
- kube2: 192.168.1.109
- kube3: 192.168.1.167
Disable SELinux & Swap
setenforce 0
sed -i --follow-symlinks 's/SELINUX=enforcing/SELINUX=disabled/g' /etc/sysconfig/selinux
swapoff -a
# /dev/mapper/centos-swap swap swap defaults 0 0
Enable br_netfilter
we’ll be enabling the br_netfilter kernel module on all three servers. This is done with the following commands:
modprobe br_netfilter
echo '1' > /proc/sys/net/bridge/bridge-nf-call-iptables
Install docker-ce
yum install -y yum-utils device-mapper-persistent-data lvm2
yum-config-manager --add-repo https://download.docker.com/linux/centos/docker-ce.repo
yum install -y docker-ce
Update yum repos

[kubernetes]
name=Kubernetes
baseurl=https://packages.cloud.google.com/yum/repos/kubernetes-el7-x86_64
enabled=1
gpgcheck=1
repo_gpgcheck=1
gpgkey=https://packages.cloud.google.com/yum/doc/yum-key.gpg
        https://packages.cloud.google.com/yum/doc/rpm-package-key.gpg
Install kubectl
yum install -y kubelet kubeadm kubectl
once installation is complete, reboot all the machines & log back as sudo user.
update cgroup
update cgroup of docker-ce & kubernetes to same cgroup
Initialize the cluster
on master node issue this command, this will initialize & give ip of the master node and give the pod network ip range as per your needs.
kubeadm init --apiserver-advertise-address=192.168.1.99 --pod-network-cidr=192.168.1.0/16
Now let’s join the nodes using the command below,
kubeadm join 192.168.1.99:6443 --token TOKEN --discovery-token-ca-cert-hash DISCOVERY_TOKEN
Deploy flannel network
kubectl apply -f https://raw.githubusercontent.com/coreos/flannel/master/Documentation/kube-flannel.yml
How to create multi master node configuration?
You can use kube-up and just copy the existing master using the command below,
KUBE_GCE_ZONE=europe-west1-c KUBE_REPLICATE_EXISTING_MASTER=true ./cluster/kube-up.sh
Here, kube_gce_zone is the the zone where the new master will be created
Logging and Monitoring
Explain kubernetes termination lifecycle
1) Terminating State
Pod stops getting new traffic
2) preStopHook (optional)
A http request you can use to terminate pods instead of SIGTERM
3) SIGTERM signal
Sends a signal to container that they are going to be shutdown now so that the code will cleanup ongoing tasks like database connections, web sockets etc..
4) wait for graceperiod
You can use this option if your pod need more time to shutdown
5) SIGKILL signal (if container still running after graceperiod)
