
This blog post, I will show you how to setup mysql with JDBC drivers in matlab
Step-1: Add JDBC driver to the MATLAB java classpath using javaaddpath
First of all, download mysql-jdbc jar file and save it in some desired location, I am on ubuntu and I saved it under /usr/local/. I use javaaddpath command to add the driver to the classpath. NOTE: Execute the below command on MATLAB
javaaddpath /usr/local/mysql.jdbc_5.1.5.jar
Step-2: [Optional] Add JDBC driver to the MATLAB java classpath using javaclasspath.txt
Create a file with name javaclasspath.txtunder preferences folder, to check the preferences directory, execute below command on MATLAB
prefdir
In my case, below is my preferences folder, so I will use this path to create javaclasspath.txtand update the path
/root/.matlab/R2018b
Since I am on ubuntu, I will use the below command to update the static path, you can use any of the editors for updating the same depending on the operating system you use.
echo "/usr/local/mysql.jdbc_5.1.5.jar" > /root/.matlab/R2018b/javaclasspath.txt
Step-3: Restart the PC
Sometimes, We realize this lately, I was wasting time on trying to fix the JDBC error without restarting the computer.

Step-4: Configure MYSQL
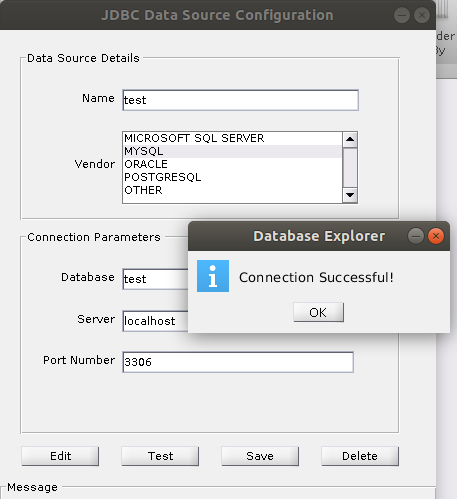
Finally, let’s set this up, Open database explorer from APPS tab and click on configure data source, then name your database and test the connection as shown below. Once the connection is successful, save and close the window.
Note: I made my configuration on the following system profiles,
- OS: ubuntu 18
- Matlab 2018b
- Mysql Ver 14.14 Distrib 5.7.25
- Openjdk 1.8.0_191
- mysql-connector-java-8.0.15.jar