
In this blog post, I will demonstrate how to install kubernetes on aws cloud using kops tool.
Step-1 Create hosted zone
- Create aws free tier account
- Login to aws web console
- Services > Route53 -> DNS Management -> Create hosted zone
- copy the nameservers
Step-2 Get a domain/subdomain
- Create domain on freenom.com
- Add the AWS nameservers
- Create s3 bucket
Step-3 IAM
- on aws web console > services > IAM
- users > add user
- Access type > check the following
– programmatic access
– aws management console access - next
- Create group > group-name: admin (select adminstrator access)
- next > create user
- download csv (credentials.csv)
Step-4 Install & configure aws
- installing aws: http://docs.aws.amazon.com/cli/latest/userguide/installing.html
- aws configure & provide from the credentials.csv
- region can be of your choice
Example:
~ $cat credentials.csv

User name,Password,Access key ID,Secret access key,Console login link
test-user,5f9EAAAAH*ZG,AKIAJAAAAM4RKQZBWNQ,dAcPTlq6dAAAAAAAy5+H53PCM4F,https://AAAAAAA.signin.aws.amazon.com/console

~ $aws configure

AWS Access Key ID [****************BWNQ]: AKIAJAAAAM4RKQZBWNQ
AWS Secret Access Key [****************CM4F]: dAcPTlq6dAAAAAAAy5+H53PCM4F
Default region name [us-west-2]:
Default output format [None]:
Step-5 Install kops
Install kops on your system, click here for installation guide
Step-6 Create cluster & Update
Create
syntax:
kops create cluster --name=<domain name> --state=<s3-url> --zones=<aws-zone> --node-count=2 --node-size=t2.micro --master-size=t2.micro --dns-zone=<domain name>
in my case:
kops create cluster --name=kops.cf --state=s3://kops-state-s3 --zones=ap-south-1a --node-count=2 --node-size=t2.micro --master-size=t2.micro --dns-zone=kops.cf
Update:
syntax:
kops update cluster <domain-name> –state=<s3-url> –yes
in my case:
kops update cluster kops.cf --state=s3://kops-state-s3 --yes
If you want to delete the cluster anytime you can use the following command,
kops delete cluster --name=kops.cf --state=s3://kops-state-s3 --yes
Step-7 Install kubectl
Kubectl is a command line tool that helps you deploy & manage applications on kubernetes. Installation link here
Step-8 Wait & Verify
- Wait for DNS A records to appear
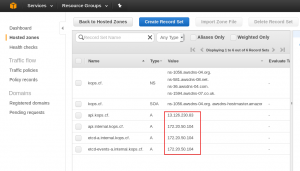
~ $kubectl get nodes
NAME STATUS AGE VERSION
ip-172-20-35-98.ap-south-1.compute.internal Ready,node 36m v1.6.2
ip-172-20-50-104.ap-south-1.compute.internal Ready,master 39m v1.6.2
ip-172-20-54-228.ap-south-1.compute.internal Ready,node 36m v1.6.2
Step-9 Install dashboard (Optional)
Dashboard lets you view resources installed on kubernetes. click here for guide
Please check out my other blogs posts on goacademy