
Introduction
This is a blog post series on Java Programming. In this blog post, I will cover introduction & installation part. In the next blog posts I will cover the core concepts of Java.
About Java
Java is a general-purpose computer-programming language that is concurrent, class-based and object-oriented. It is intended to let application developers “write once, run anywhere” (WORA), meaning that compiled Java code can run on all platforms (windows, linux or mac) that support Java without the need for recompilation.
Java was originally developed by James Gosling at Sun Microsystems (which has since been acquired by Oracle) and released in 1995.
Java is widely used in web-development using frameworks like spring and hibernate that powers the bank-end-development. Well, there are hundreds of frameworks available for java which makes web development with java a versatile option.
Installation
We often hear about JDK when it comes to java installation. JDK stands for Java Development Kit, which is required for development. If you install JDK, you don’t need to install JRE (Java Run-time Environment) separately.
Installing JDK on ubuntu/kali linux/debian
The following installation procedure applies for all debian based linux distros. First update your packages using the command below,
apt-get update
Which version of java to install?
The question that comes to everyone’s mind is, “which version should I install”, It obvious that everyone wants to install the latest version. To check the available latest version provided by your linux sources, run the below command.
apt-cache search openjdk
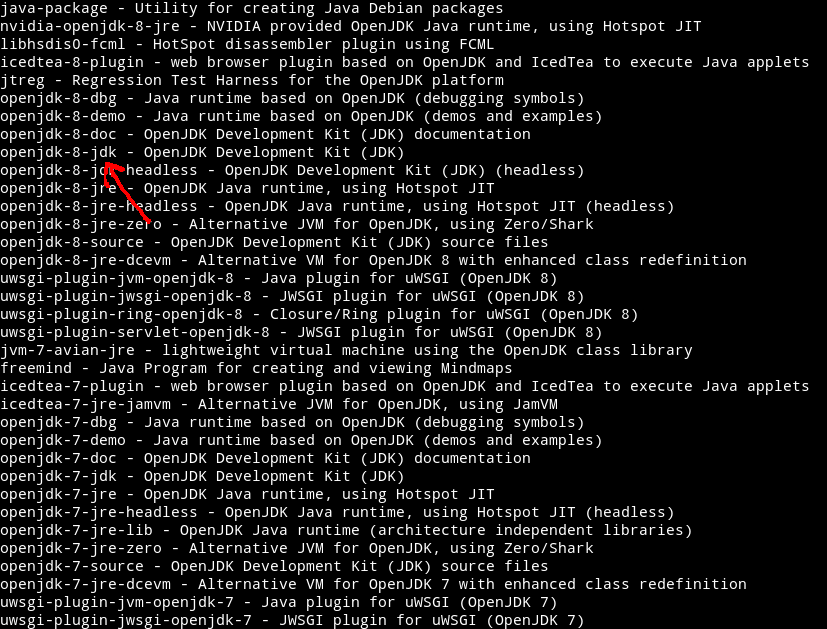
This will show you up the existing JDK, like as you can see above, I have openjdk-8-jdk. So I will install it using apt-get.
apt-get install openjdk-8-jdk -y
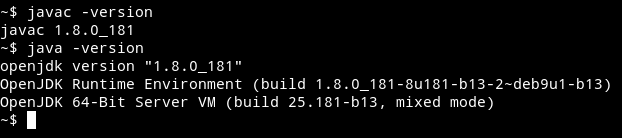
Once, the installation is complete, you need to verify it by running commands below, this is to check we have same versions of java compiler and java run time.
javac -version

java -version
Incompatible java versions?
If you have an incompatible versions of java compile & run time, then please refer to this blog post about how you can update alternative java without deleting the old one.

Let’s verify our installation by executing a simple hello world java program,
public class Hello {
public static void main(String[] args) {
System.out.println("Hello, World!");
}
}
Note
 Please note that while you save this in a file, name it exactly with class name (case-sensitive)
Let’s compile it & then run it.
javac Hello.java
This compilation will produce a runtime with name “Hello” & let’s execute it using,
java Hello
If everything went fine, you should have “Hello, World!” in the output.
Installing JDK on Windows and MAC
Please refer to this blog post for installing JDK on windows, its simple & easy. Mac users please refer this blog
Setting up the IDE
Now, we are all set to install the IDE (Integrated Development Environment). IDEs are like editors with enhanced capabilities like auto-complete, plugins for tools like maven, it makes development a lot easier. We have few choices here,
- IntelliJ
- Eclipse
- Netbeans
- JDeveloper
The most popular opensource IDE is Eclipse. IntelliJ is the second most popular choice for java developers. Netbeans & Jdeveloper are also a couple of options we have. Eclipse as the best plugin market, so I will cover that.
Installing Eclipse on Linux
Installing eclipse IDE is so easy, all you have to do is to extract the downloaded setup. (download link here)
tar -xvf eclipse-inst-linux64.tar.gz
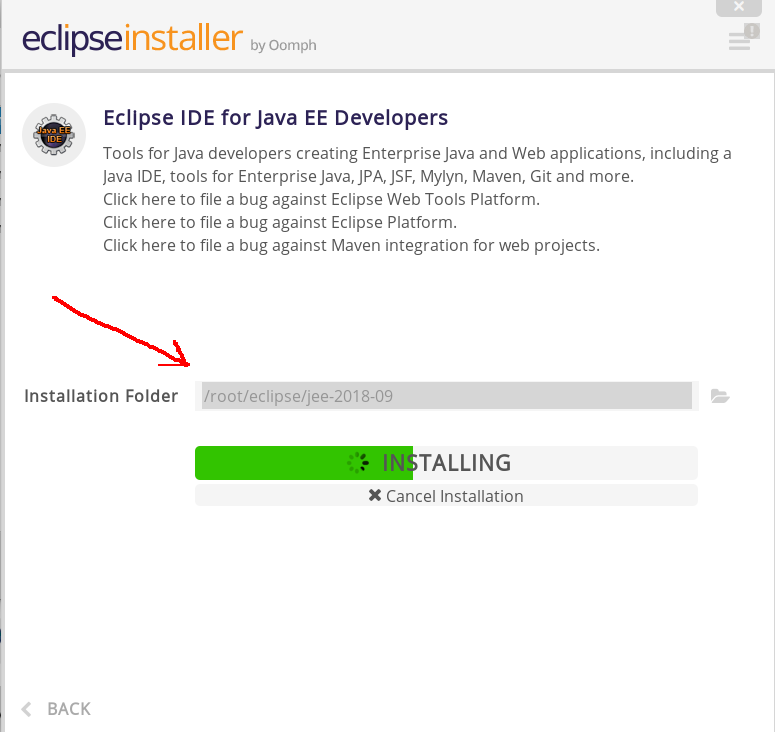
This will extract the eclipse installer, you can run the installer ./eclipse-inst. This will pop-up a screen below. Select the second option, “Eclipse IDE for Java EE Developers” & click on install. Make a note of the installation folder.

Please make a note of the installation folder as you can see in the screenshot below, my installation directory is /root/eclipse
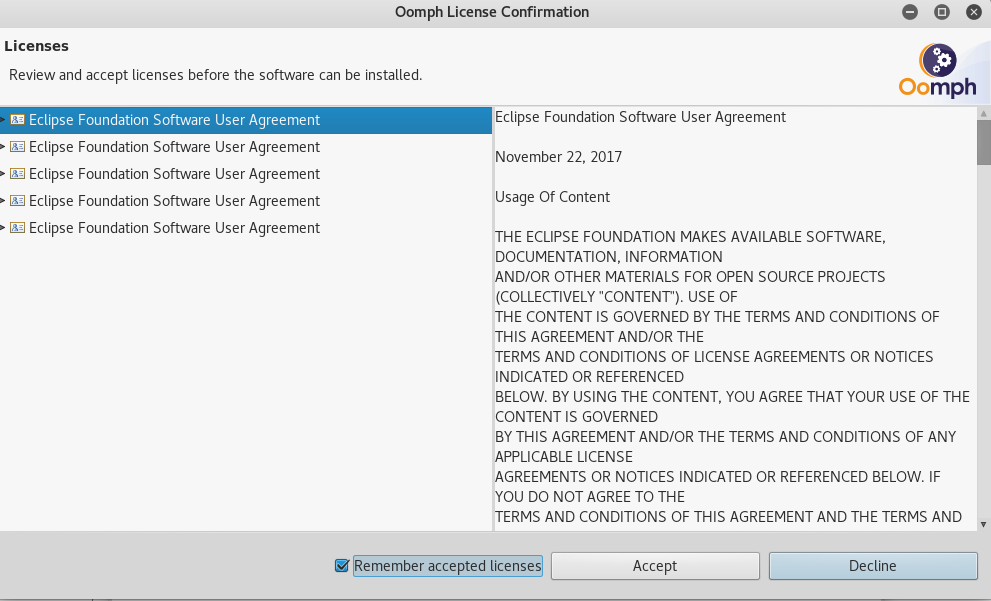
This will pop-up the Accept the license agreement, who reads it! accept & forward to next step.
Once the installation is done, click on launchand then select workspace.
Note
Hey! Note this! next time when you launch eclipse, you need to launch it from the installed directory! In my case, its /root/eclipse/jee-2018-09/eclipse/ using the below command.
./eclipse
Optionally, you can add a shortcut icon to it using alacarte.
Installing Eclipse on windows or mac
Installation procedure for eclipse on windows/mac or linux is pretty much the same. You need to extract the tar or zip file and run the installer & rest will be taken care by it.
That’s it!
So, that’s it for this blog post, we have covered pretty much everything required to start with java development. We will talk about the core concepts of java in the next part of this series.
Please also checkout other blog posts on goacademy